| Sculpting Tips and Tutorials | |||
 |
Sculpting Series | ||
|
|||
| Â | |||
 |
Sculpting Tips and Tricks | ||
|
Polymer Clay Sculpting Tutorials
Wax Sculpting Tutorials
General Sculpting Tutorials (not specific to one medium)
Mold Making Tutorials
|
|||
Search Results
Sculpting Tutorials
On March - 15 - 2007
Sculpting Tentacles Tutorial
On August - 24 - 2009
I’ll have to admit that I have a thing for the sea lately and a lot of my more recent artwork uses the sea as a common theme. So far I’ve sculpted a female warrior on a giant seahorse and I’m currently working on another personal project that is half woman and half octopus (kinda cool 😉 ). I have quite a few other ideas floating around in my head but as always time seems to be against me. Read the rest of this entry »
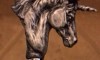
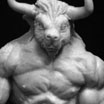
Sculpting Scales
On September - 17 - 2012
There are a lot of different ways you can sculpt scales and the tutorial below is just one of many examples that you can use. I’m using a wax in this tutorial but the same steps can be used with polymer clay.
- The first step is to design and sculpt the forms of your sculpture (i.e. muscles bulging, wrinkles in skin, etc)
- Next, using a sharp tool I will draw patterns into my wax.
- Periodically I’ll brush away the excess wax to clean my surface while I work.
- Once I have my pattern to my liking I’ll go back and carve a deeper cutout around my shapes.
- After the excess wax has been removed I’ll begin to smooth out and clean up the sculpture with Odorless Mineral Spirits (use rubbing alcohol if you are sculpting with polymer clay). Read the rest of this entry »
Angel & Demons Cigar Ashtray Tutorial
On January - 31 - 2012
My goal for this tutorial is to show step-by-step how the GoreArtistry cigar ashtrays are created from concept to the final product. The tutorial will be covering the following topics.
- Basic picture tutorial for the sculpting of the ashtray
- Creating the mold
- Pouring a cold-cast bronze
- Sanding and polishing the cold-cast bronze
- Final product
The first step in any project is coming up with a design. Great sculpting on top of a poor design will in most cases result in a mediocre product. However, I’ve seen projects that have great designs with average sculpting skills create something that really is interesting to look at. My goal is to hopefully strive for the best of both worlds with a product that results from above average sculpting skills and a great design (we shall see if I’m able to pull it off). Read the rest of this entry »
Cigar Ashtray Sculpting Trick
On August - 11 - 2011

For the most part I live a very healthy lifestyle, I’m in the gym six to seven days a week, eat very clean (except for Saturdays) and rarely drink. I’m not oblivious to the fact that most people will probably find me to be a pretty boring person but hey I am what I am. However, that being said one of the vices in my life is that I like to smoke cigars. I don’t get to smoke them often, at best only a couple times a week, but they are something I’ve come to really enjoy over the years.
I enjoy collecting different cigar accessories, for example lighters and cutters, however one of the key accessories that was missing from my collection was a cigar ashtray. There are quite a few cigar ashtrays out there that have a good design but I have yet to find one that really grabs my attention. One of the key advantages of being an artist is that if I’m unable to find what I’m looking for in the commercial market I can always create it myself. I wanted an ashtray consisting of skulls and skulls so it was off to the workshop to begin my project. Read the rest of this entry »
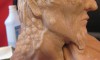
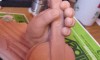
Sculpting the Belly Button
On September - 21 - 2009
In this next tutorial I will walk you through the steps for sculpting a belly button. Belly buttons are actually made up of interesting shapes and there really is a lot more to sculpting them then just creating a hole inserted into the clay. Now belly buttons come in all types of shapes and designs but there are some traits that are common in most belly buttons. For instance there are small folds of skin in and around the belly button. Also, if you look closely the design and shape of the stomach also changes around belly buttons as well.
Because belly buttons come in all kinds of shapes and sizes there are many different types of belly buttons that you can sculpt. Keep in mind that this tutorial is just one example of how a belly button can look. So use this tutorial as one option for sculpting a belly button and see what designs you can come up with. Read the rest of this entry »
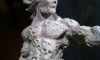
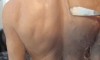
Sculpting Tribal Scars
On September - 4 - 2009
There are several different ways that I could approach sculpting the scars on my sculpture and no one way is really better than the other. Since I’m working with polymer clay, Super Sculpey to be specific, the easiest approach in my opinion is to roll out snakes of clay and remove the unwanted pieces. If I was working with wax I may take a different approach such as adding small balls of wax one at a time but I would have to experiment first before confirming.
* Note: I’ve blocked out parts of the sculpture in case anyone is sensitive to nudity. Once I’m finished I’ll add a link to an uncensored picture of the sculpture for anyone that wants to see the complete design. This will be done at the end of the tutorial and for now I’ll just censor the pics as needed. Read the rest of this entry »
Sculpting Tentacles – Lesson Two
On August - 26 - 2009
If you are using a polymer clay and are happy with the results from the previous lesson then I would recommend that you go ahead and bake your sculpture. It’s not a requirement but you will mess up the details if you like to hold your sculpture in you hand while you sculpt. If you choose to bake your polymer clay sculpture make sure that you apply Vaseline to the baked piece before proceeding with this tutorial. Read the rest of this entry »
Sculpting Tentacles – Lesson One
On August - 25 - 2009
I’m going to use wax for this tutorial but the same effects can be achieved with polymer clay.
Tools needed:
- Polymer clay or wax
- Mechanical pencil
- Dental Tools
- Soft brush
Fiddler Sculpting Series
On August - 9 - 2009
The Fiddler

Ever hear Charlie Daniels “The Devil Went Down to Georgia” song? Well if you have a pulse and are over the age of twelve then you probably have. To make a long story short I thought I would do a sculpture based off of that song. Not that it is my favorite song in the world or that I’m Charlie Daniels number one fan (although I do think it is a pretty cool song), I just thought it would make an interesting sculpture.
I’m going to put together a series of tutorials for this sculpture where you can see step by step how the sculpture is created. Now keep in mind that at first the sculpture is not going to look like much but over time, as the series progresses, you should be able to see how I turn a block of clay into a unique piece of art. I think this will be a fun lesson for everyone and a great way to see how a sculpture comes to life. I will add links to the different lessons below so bookmark this site and come back frequently to see the latest lessons. It takes me over 100 hours to complete a sculpture so don’t expect this thing to be completed over night ![]()